Fitting The Crankshaft
Fitting main bearings and oiling before fitting crankshaft
Fitting thrust bearings
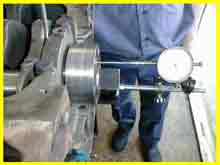
Checking crankshaft end float
ENGINE ASSEMBLY HINTS
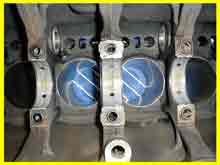
Fit the crankshaft….. Ensure the main tunnels are dry and clean. Mount the main bearing shells ensuring the uppers are fitted to the block and the lowers to the caps. Fit the thrust bearings to the cap and tunnel using a smear of petroleum jelly to secure them in position.(if separate thrusts) Ensure the bearing material of the thrusts is facing the crankshaft. Oil the mains and place the shaft in the block. Fit the main caps. Lightly oil the threads on the main bolts and oil the contact area on the bolt head and tension to specifications. Rotate the crankshaft and check for free rotation. Any binding at all will indicate a problem. The shaft should be able to be spun by hand and continue to rotate under its own weight. Anything short of this result means a problem exists with the straightness of the shaft or main tunnels.
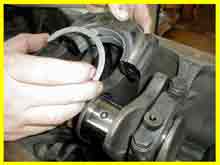
If rotating the shaft a tight spot or binding occurs, remove the crank and check for witness marks on the main shells. Recheck tunnel straightness, crank straightness, main tunnel size, bearing thickness, main journal size, damaged journal or dirty assembly. If the crank spins freely and the thrust clearance is within limit the crank could be left in place and the rear main seal mounted. If a wick type rear main seal remove the shaft and fit the wick seal. Fitting the rear main wick seal prior to this would have inhibited the ability to verify a freely rotating shaft. Once the rear main is fitted replace the shaft again rotating the shaft to check the seal drag. Sometimes the wick seal may need to be re-worked again before the seal drag is acceptable. When the shaft can be rotated by hand without the aid of a spanner (simply by holding on to the crank web) the wick seal is considered to have the correct drag. With the crank fitted extra oil is to be directed beside the main caps and down the rear seal oil relief to ensure good lubrication on start up. Rear wick seals can pick up and turn or just simply burn if this procedure is neglected.
Dial gauge the end thrust of the shaft and ensure it is within tolerances. A general rule for minimum thrust clearance is as simple as dividing the shaft main journal diameter by 450. The answer is correct using metric or imperial measurements. The general rule for maximum thrust clearance is to divide the shaft main journal size by 350. Always use manufacturers specifications if they’re available. Anything outside these limits should be corrected by re-grinding and fitting oversize thrusts or a replacement crankshaft.
When setting up the thrust bearings ensure the upper and lower thrusts are aligned together so the thrust load is spread evenly over both halves of the thrust bearing. This is achieved by fitting the thrusts, main caps and bearings but only tensioning the thrust main cap to 10ft/lbs. Tension all other main caps to the correct tension. Thrust the crank shaft forward, then backwards, then forward again, this will align the cap thrust with the block thrust. The best way to move the crank to check thrust measurement is with a lever between a crank web and a suitable tensioned main cap. Now tension the thrust main cap to the correct finished tension, dial gauge the end thrust and check it is within specifications. This procedure may have to be carried out a couple of times during the assembly of the crank.(e.g. prior to fitting a wick seal and after the wick seal is fitted) Always ensure that the final assembly of the main caps and crank finishes with the thrust cap alignment procedure. Otherwise extra thrust load will be applied to the misaligned thrust half.
: Every care has been taken in writing this information and procedures, but no responsibility can be excepted for errors, omissions or misuse of this information and procedures. The information available on this site is for your instruction only and cannot be copied for sale, © copyright 2020 UMR Engines www.engineproblem.com.au